Step 1: Preparation Plan
If you've decided you're ready to start a new website project or are looking to overhaul your existing site the following guides are here to help you take a structured approach to your project.
The guides are divided into 5 parts, which essentially follow the main steps of managing a web build. However, depending on your needs, you may just be looking for guidance in a particular area.
Part 1: Preparation plan
Part 2: Project management templates and useful tools
Part 3: Example website templates
Part 4: A guide to web build options
Part 5: FAQ and glossary of terms
Step 1 - Assess your needs, skills & resources
Firstly, take time to consider what you need your website to do. Is it only to give visitors basic information such as location, contact details and service times, or do you want to showcase a wider range of dynamic content such as events, news stories and community activities?
Then assess your available resources in terms of skills, people, time and budget to meet those needs.
People
Is there an eager member of staff or a volunteer who is a technical whizz and willing to help? This can be a great aid but be mindful to assess the implications of building on a particular platform or system that requires specialist knowledge or coding, who owns and has access to the site and what might happen if that person is no longer available to offer their time and help. Also bear in mind the two set in stone principles:
No one person should be the go-to and bearer of all knowledge with your site
Keep email log-ins and passwords shared
Time
What amount of time can you dedicate to creating a new website? Once you get started on this journey you may realise that the work required to create and structure the content, source images and information is just as much work as the building of the site itself.
After the site is complete who will maintain, edit and add new content? Who will manage enquiries and any technical requirements such as security updates and domain renewals?
Budget
Do you have a budget to spend, or are you reliant on free or volunteer support? If you have a budget consider both the initial build costs and any ongoing maintenance costs. This may be the deciding factor as to whether you opt for a DIY route or engage a professional or agency to build your site.
Step 2 - Develop a brief
Whether you are building the site yourself or someone else is, a solid brief will help keep your project on track. But be flexible as your brief may change as your project progresses so be sure to revisit and update it as necessary.
Once you have established your needs, skills and available resources these considerations can form the foundation of your project.
Here are a few of the key considerations for your brief:
Purpose:
Why are you undertaking this project? What are your objectives and what does a successful outcome look like?
Audiences:
Who is your website for and what needs do they have? Reading through Church of England Personas research, which was developed specifically for digital, may help you think about and understand the needs of your own audience(s) better.
Functionality:
Once you have established your audience and have an understanding of their needs, it will inform the type of functionality your site may need. In addition to the basics; your location, contact details, service times etc, will you need to list events, groups, and upload documents for visitors to view or download?
Assets:
What site assets do you have? This will include the written content, photographs and documents you may want to share. Our next steps about conducting a Content Inventory and Audit will help you think about this in more detail.
Project Management and Build:
Who will manage your project and who will build the site? It could be the same person or an agency may be involved. Alongside creating a solid brief, organising who will run the project and other responsibilities at the start can save you time and possibly even money.
Governance:
How will your project be governed? Is one person making all the decisions, or are there other stakeholders who need to be consulted or give their approval at certain stages of the project? It's important to factor this into your overall project planning.
Maintenance:
After the project is complete, who will look after and maintain the site? Are there daily responsibilities like answering enquiries from a contact form, weekly updates like adding new service times, or creating and publishing news stories? Depending on your site and its hosting options, there may also be more technical requirements such as security and platform updates.
Measurement:
How will you evaluate your site and its success? Think about what you want to understand about your visitors and how they interact with your site and other digital communications, such as newsletters. Adding Google Analytics can be an easy first step to develop a baseline of statistics with which to build on.
Step 3 - Content Inventory
A content inventory is the process and the result of cataloguing the entire contents of a website. An allied practice - a content audit - is the process of evaluating that content.
What assets do you have?
This includes written content, images, logos, documents, videos etc.
Documenting and collating what you have will help you organise your content and spot what could be missing or superfluous. Whoever will be responsible for adding the content to the website will need to be able to access this information and make sense of it.
Ordinarily, you will not be able to just import or migrate your content to a new website and if you need a new website it's likely your content needs updating too.
Step 4 - Understanding your Audience
Key to a successful website is knowing who your audiences are and creating a site and content that is relevant and engaging to them.
You may want to gather information or thoughts from your current visitors and congregations to understand what is important to them. And perhaps what they like and don't like about your current website.
Before designing its current website The Church of England undertook a large research project to understand the needs of users, holding consultations with dioceses and churches in both urban and rural areas, alongside the needs of the general public, internal users and staff.
Part of this involved developing 'Personas' which aggregate the needs and views of those consulted plus those of the general public. You can read these personas guides which may help you think about your own users needs.
Church of England Audiences - Persona research
If personas seems like too big an ask to manage, simply use post it notes. Using one post it per type of person that you would like to be using your website.
Step 5 - Content Audit
After you've made a Content Inventory undertake a Content Audit. This is the process of evaluating the content.
Is your content fit for purpose, does it meet your audience's needs and is it written for the web? See Step 6 for more information on Writing for the Web.
Preparing your online content is perhaps the most critical building block in making your new website a success. Without knowing what content you have and how it will be organised it will be difficult to select a template or design for your website. Think of it like packing for a holiday, if you don't know what the weather will be like or how long you are going for, how will you know what clothes to take and size bag you need to pack?
You may admire a website design with big full-screen images and sharp headlines and calls to action but you will need a good selection of high-quality images and crafted copy to achieve the desired look.
Always make sure your content is relevant for your audiences.
Step 6 - Writing for the web and why it's different
People read differently online than when they read print materials - web users typically scan for information. In a study of online reading behaviour, Jakob Nielsen found that “on the average webpage, users have time to read at most 28% of the words during an average visit; 20% is more likely”.
The quicker they can read your page and find out what interests them, the better.
When writing for the web, using plain language allows users to find what they need, understand what they have found, and then use it to meet their needs. It should also be actionable, findable, and shareable.
*Source: study of online reading behaviour, Jakob Nielsen.
How people read a website
- Users read very differently online than on paper. They don’t necessarily read top to bottom or even from word to word.
- Instead, users only read about 20 to 28% of a web page*. When users just want to complete their task as quickly as possible, they skim even more out of impatience.
- Web-user eye-tracking studies show that people tend to ‘read’ a webpage in an ‘F’ shape pattern. They look across the top, then down the side, reading further across when they find what they need.
- What this means is: put the most important information first. So we talk a lot about ‘front-loading’ sub-headings, titles and bullet points.
- For example, say ‘Sunday Service’, not ‘What’s on in the service at the church today?’
How to get started writing for the website
- Research, research, research - spend time looking at what has already been written
- Visit forums search social media – find out how your audience is talking about this topic
- Write down everything you want to include in note form
- Don’t get bogged down in detail. This is web copy, not a thesis.
- Plan the order of your content – put the most important things first
- Think about how you would talk to someone face to face about the subject
- Use language your audience uses – but stay authentic
- Think about whether a graphic or picture could convey the message
- Print out what you have written, take it to a private room and read it out loud.
- Edit it down – be ruthless
- Ask someone to proofread it for you
The Plain English Society provides guidance for making written content more accessible. Here are a few quick tips, based on this advice which is specific for church audiences.
You can download a PDF copy here.
Writing for the web
A basic guide for churches and chaplaincies.
- We are friendly and open. This is a face to face conversation, not a sermon.
- Use the words people use every day. By using keywords that your users use, you will help them understand the copy. You will also help optimise it for search engines.
- Use Plain English. Everyone needs to be able to understand every word on the website. We don’t want to put anyone off.
- Break up your content. Use short paragraphs and subheadings to make your content more scannable. Break it into manageable sections. Follow an F pattern.
- Front load the important information. Start with the content that is most important, and then provide additional details.
- The user is “you”. The church is “we.” This creates a clearer sentence structure and more approachable content.
- Use active voice. “The bishop spoke to the children” not the “The children were spoken to by the bishop”
- Use short sentences and paragraphs. The ideal standard is no more than 20 words per sentence, five sentences per paragraph. Vary your sentence length for a natural tone. Not too long winded, not too choppy.
- Use bullets and numbered lists. Don’t limit yourself to using this for long lists—one sentence and two bullets is easier to read than three sentences.
- Use clear headlines and subheads. Questions, especially those with pronouns, are particularly effective.
- Use images, diagrams, or multimedia to visually represent ideas in the content. Videos and images should reinforce the text on your page.
- Use white space. Using white space allows you to reduce noise by visually separating information.
Keep it simple. Talk to people. Share the Good News.
Church of England - Tone of Voice
The Church of England’s voice is human. It’s familiar, friendly, caring and straightforward.
We are accepting and compassionate
We offer responsible, meaningful, credible, support and guidance
We share our experience
We serve people at key stages of their lives. We change people’s lives. We celebrate life with them.
We are enthusiastic
We are radical. Brave in our beliefs. Joyous in our faith. We are confident. We discuss things openly.
Our language is simple, clear and common. We use Plain English.
Step 7 - Information Architecture (IA) - Your site structure
What is Information Architecture (IA)?
You may have heard the term IA. Simply put IA is the practice of structuring, organising, presenting and labelling the elements of a website in a way that makes it logical, intuitive and easy for users to quickly find and retrieve information. For example, when someone needs to find your church location, they will likely look for a heading such as "About Us' 'Location' or 'Contact' in your site menu headings.
Your Content Audit will help you understand and form your site structure, which will help you define your site menu and how visitors will navigate your website and find the information they need.
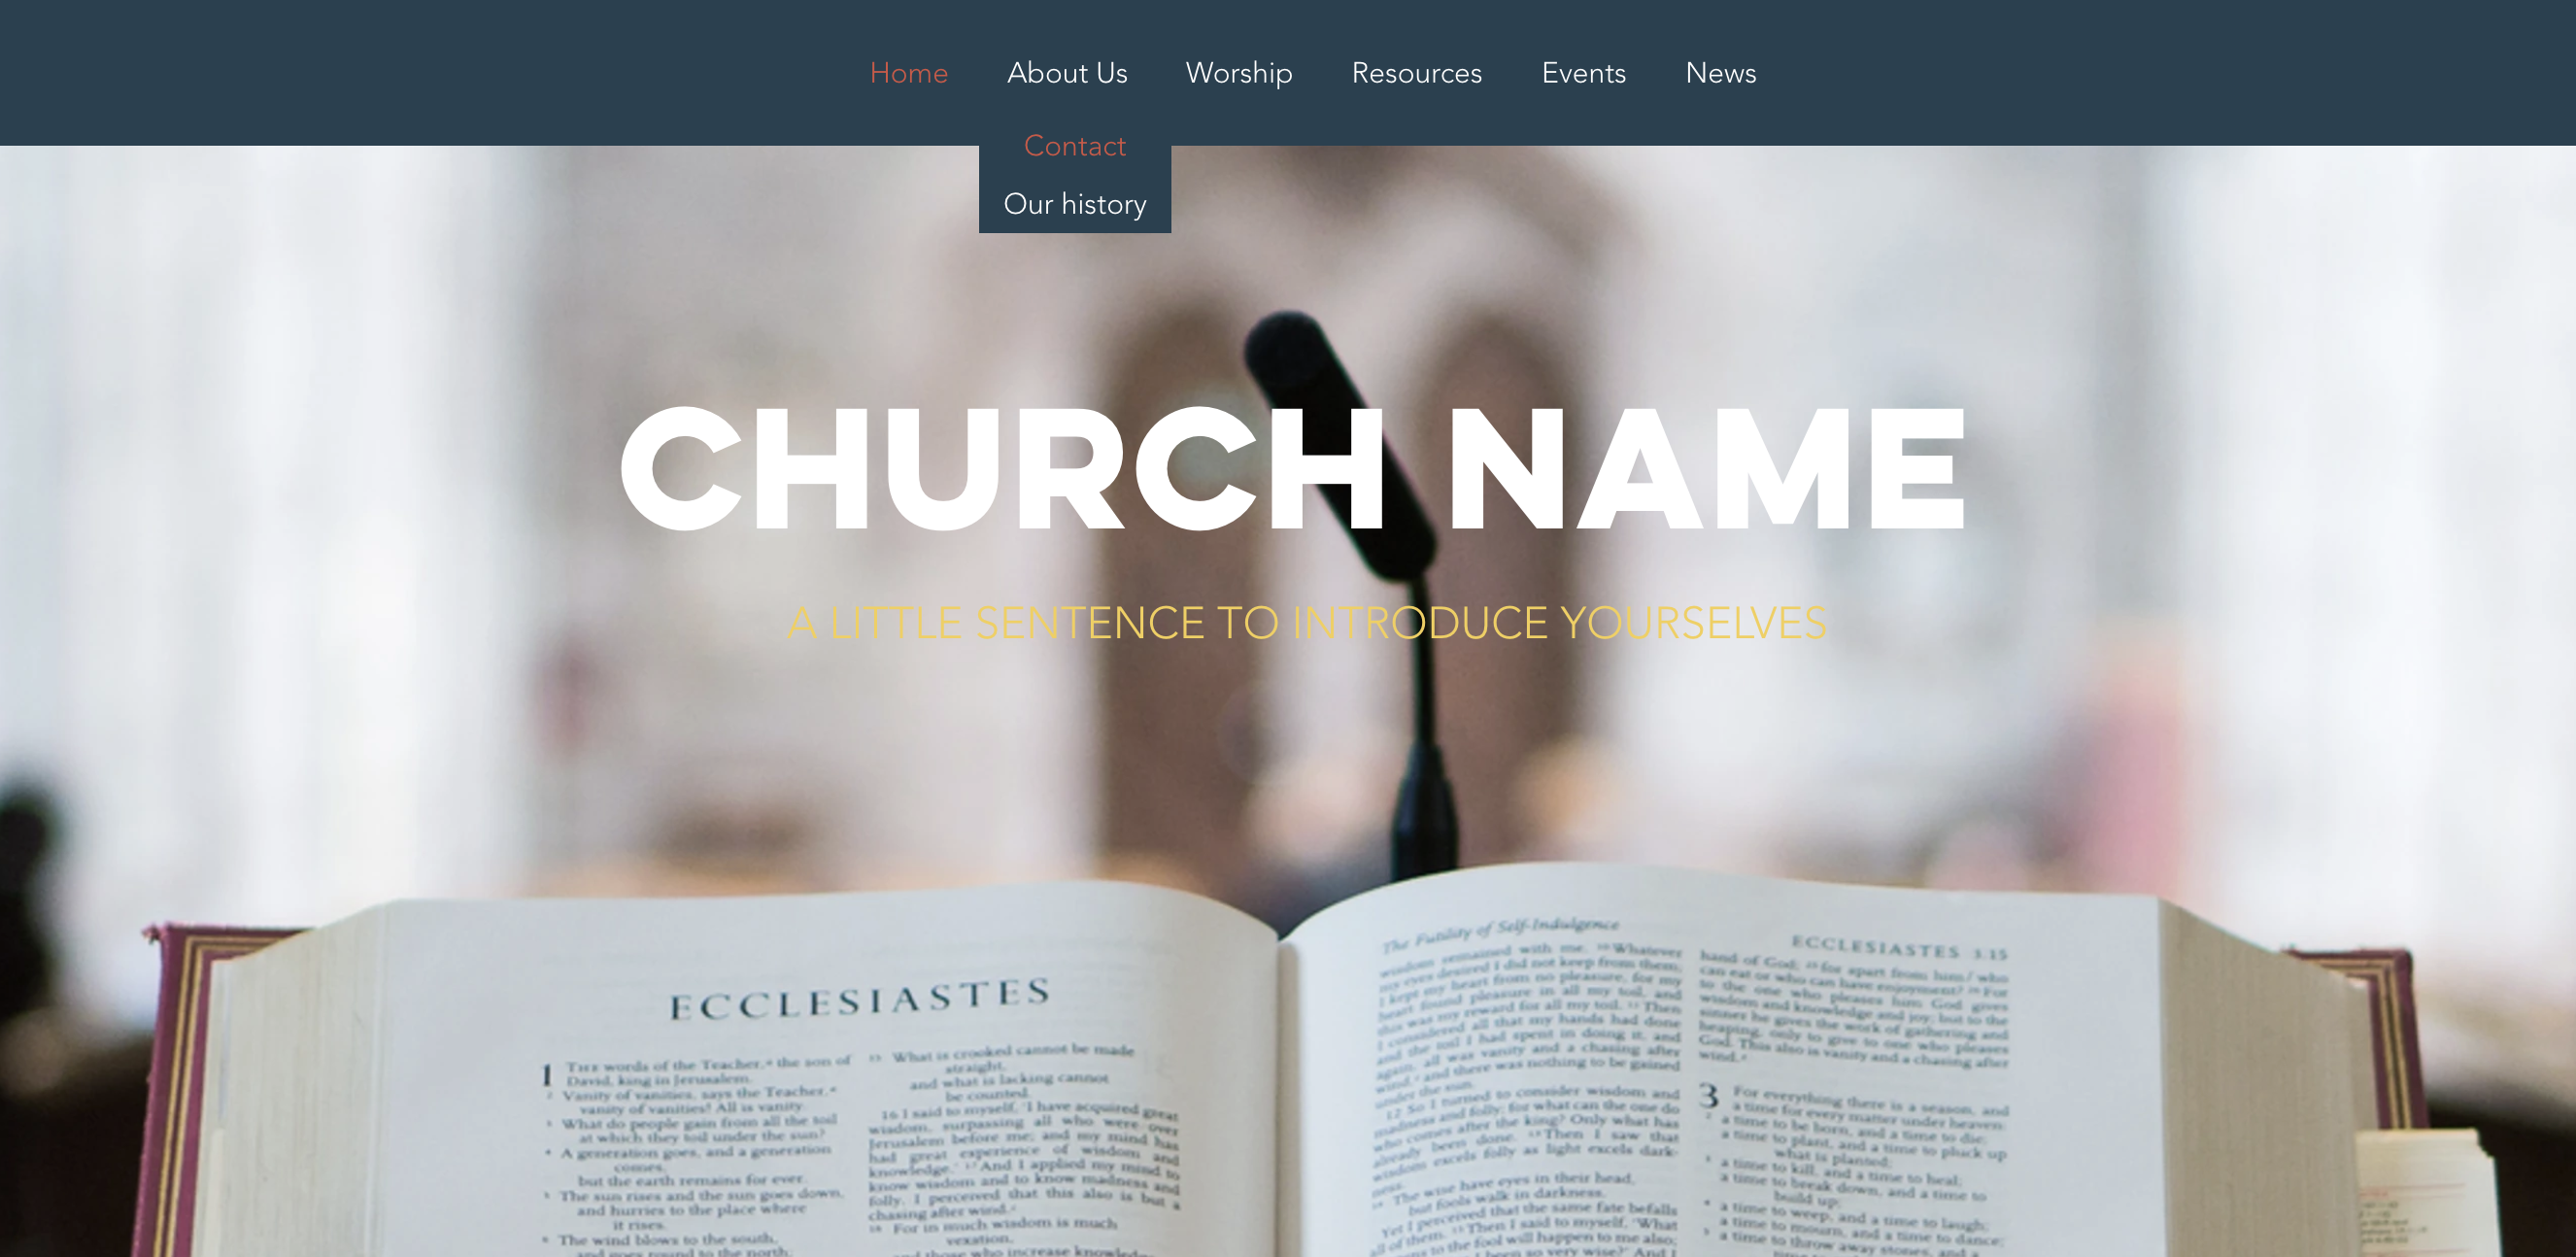
Most chaplaincies will likely have similar menu items because their needs and activities but the words used may vary by personality or tone of voice. The image below shows an example of a simple main menu items.
Home
About us
Worship
Resources
Events
News
We have included an .xls template which might be useful to help you define your menu structure.
Annex X - IA templates. See example IA’s relevant to church sites which will help you think about structuring your site and its menu.
Step 8 - UI and UX - What are they and why are they important?
In digital design, user interface (UI) refers to the interactivity, look, and feel of a product screen or web page, while user experience (UX) covers a user's overall experience with the product or website*. If you would like to understand more about these aspects of design the guide linked below provides a more in-depth overview.
If you hire a designer or agency to work with you on your site they will likely mention these terms but even if you are building the site yourself it's very helpful to have a basic understanding of the concepts, both of which will help you think about your site visitors and how to create the best experience for them.
Source: Figma.com
Step 9 - Design & Branding
Now you can start to think about the 'fun' part - what do you want your site to look like? Colours, style, on-screen interactions and more.
Take some time to think about sites you like and use frequently. What is it about them that you like? Is it the design, ease of use, colours, particular functionality or something else?
Think about the 'personality' of your chaplaincy and how the website will reflect this. It should help reinforce your mission, vision and values.
Do you have a logo and or brand guidelines? If not, this is also a good time to have a logo designed. What colours or images are relevant or associated with your chaplaincy? Perhaps you have beautiful stained glass, or stonework, a lovely garden or tree. These things can help create a motif and form part of your brief to a web designer.

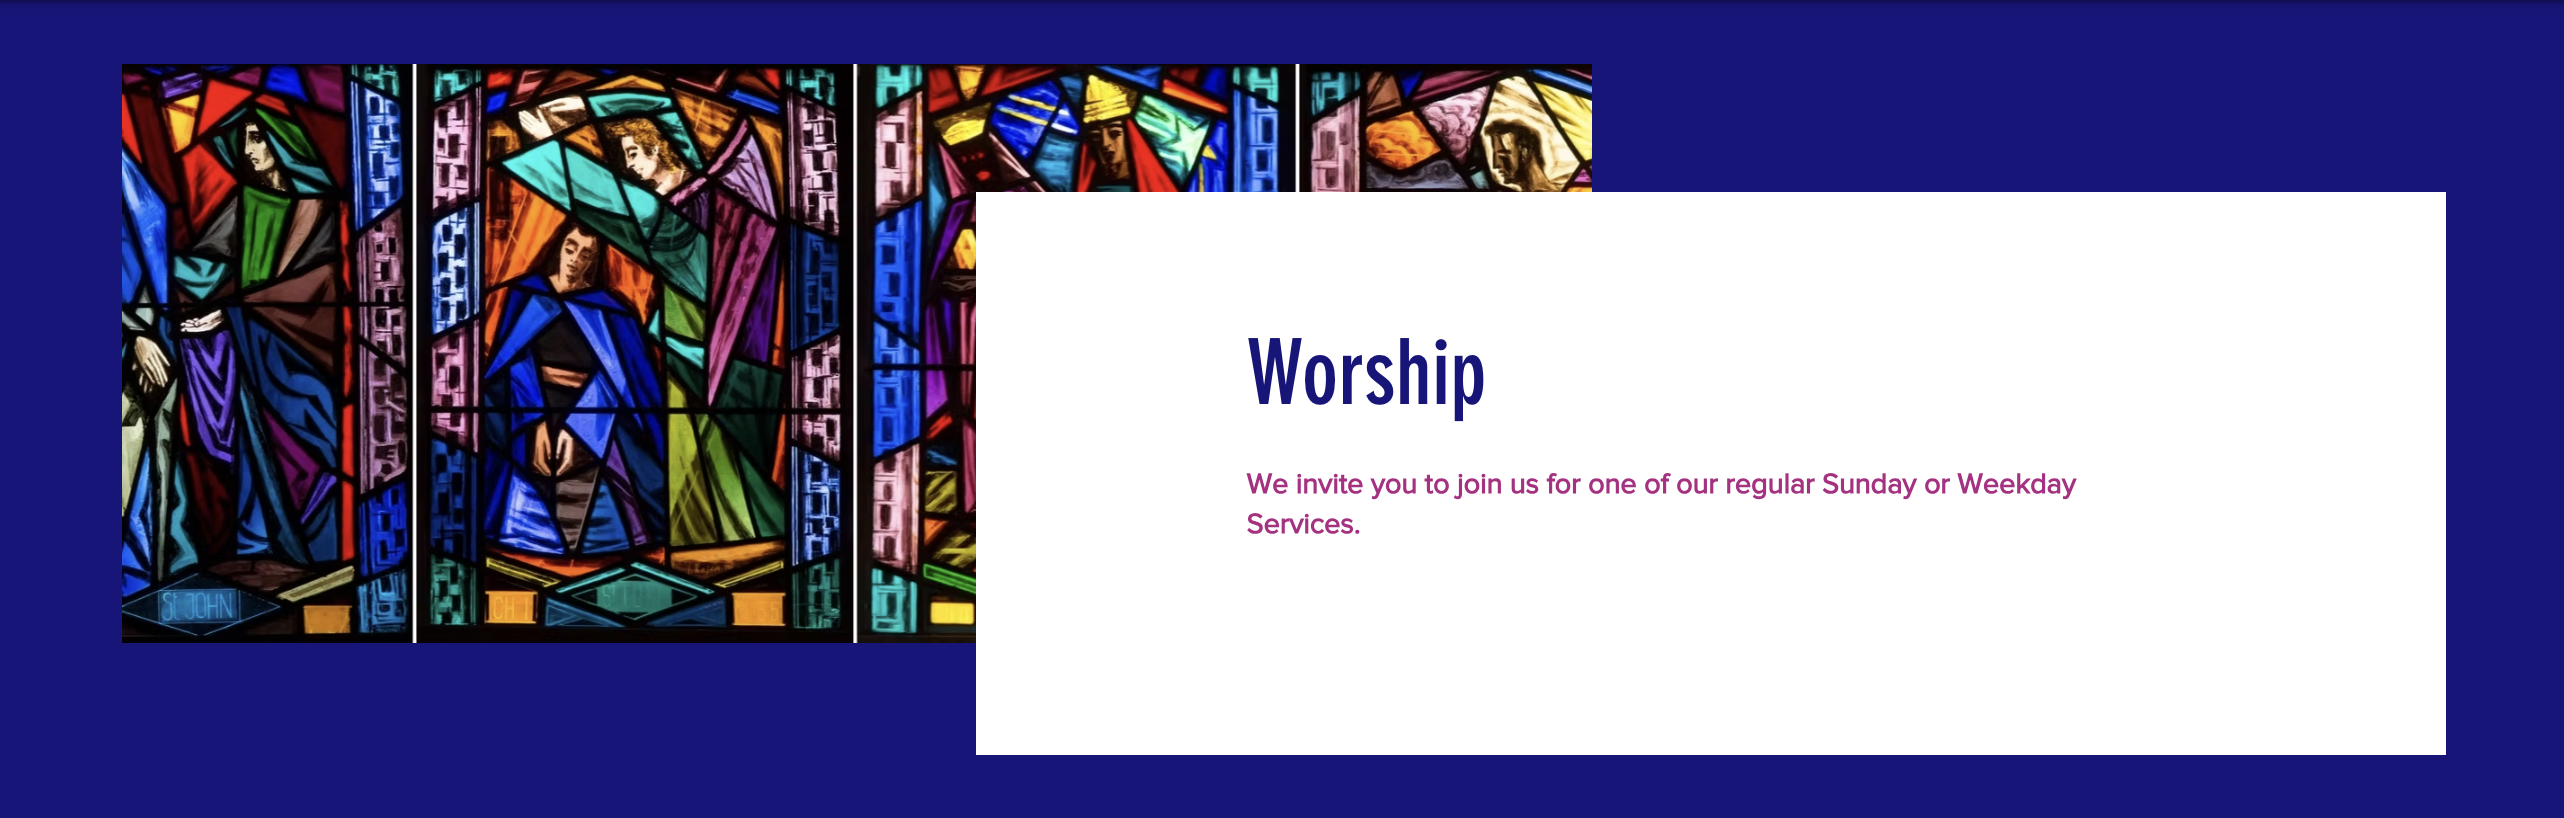
Example website header from Holy Trinity Church, Geneva using photography of their stained glass windows.
We can recommend a designer who can offer a mini logo design or logo refresh. Alternatively, there are sites that offer quick and easy logo designs, sometimes for free or as part of a website package.
Modern websites and website builder templates often rely on good imagery and photography to make them appear dynamic, engaging and slick. Stock imagery is often available as part of the package but this can be impersonal or a mismatch to your own photography. During your Content Audit, you will have reviewed your available imagery. If you have good-quality photography it will be a huge advantage once you start building your site.
Step 10 - Project Management & Maintenance
Creating a new website is no small task. At a minimum, it could be a solid month of full time work, or much longer depending the complexity of the project or the time available to dedicate to it.
Having someone with good project management skills can be invaluable.
After your website is created and live, a project management approach will continue to ensure your website is managed effectively and grows with your chaplaincy.
Having a maintenance plan after go-live should be an integral part of your project.
Step 11 - Administration & helpful tools
As your website project develops you will start to accumulate a lot of information, files and documents. Keeping these well organised from the start will help you and others who are working on the project.
While you will upload images and documents to your website media library, your website should not be the primary repository for all your content. It's advisable to maintain a separate filing system for the original content, images and documents. For example, a Google Drive or One Drive.
If you are sharing information with others, these online tools also help cut down on emails and maintain version control.
If your chaplaincy has a charitable or non-profit status, both Mircosoft and Google offer free subscriptions. You may find that in addition to helpful tools you can benefit from email professional addresses which correspond to your website domain name, for example, contact@yourchurchname.org.
Step 12 - Evaluation & analytics
Adding evaluation to your project from the start will help you decide what is important to measure and whether your website is effective.
Evaluation doesn't need to be complex but must be relevant to your user's needs. Think about what your chaplaincy would like to know and measure, is it how many visitors click on your latest news story, download a Service Sheet or link to your site from Social Media?
Simple steps like adding Google Analytics to your site can be a good place to start if you are not sure what to measure. Over time you will start to see which site pages are most visited and perhaps why some are not.